IMAGES TAKEN NEAR TO
Otterton, BUDLEIGH SALTERTON, EX9 7HG
Introduction
This page details the photographs taken nearby to EX9 7HG by members of the Geograph project.
The Geograph project started in 2005 with the aim of publishing, organising and preserving representative images for every square kilometre of Great Britain, Ireland and the Isle of Man.

There are currently over 7.5m images from over14,400 individuals and you can help contribute to the project by visiting https://www.geograph.org.uk
Image Map
Images are licensed for reuse under creativecommons.org/licenses/by-sa/2.0
Notes
- Clicking on the map will re-center to the selected point.
- The higher the marker number, the further away the image location is from the centre of the postcode.
Image Listing (188 Images Found)
Images are licensed for reuse under creativecommons.org/licenses/by-sa/2.0
Image
Details
Distance
1
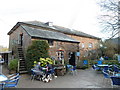
Otterton Mill
Otterton Mill now includes galleries and a restaurant as well as one working set of stones. There are two wheels that originally drove four sets of stones but only one wheel and one set of stones are workable.
Image: © Chris Allen
Taken: 12 Feb 2011
0.00 miles
2
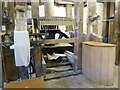
Otterton Mill
This is the working (west) side of the mill with the wooden hurst framing. The pit wheel, wallower and great spur wheel are all seen and there is slightly blurring due to motion. The meal spout is on the left. The drive to the right hand set of stones is missing and the left hand drive is hidden behind the framing.
Image: © Chris Allen
Taken: 12 Feb 2011
0.00 miles
3
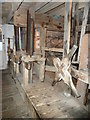
Otterton Mill
The wooden sluice operating gear for the two low breastshot wheels. The derelict eastern wheel is just visible.
Image: © Chris Allen
Taken: 12 Feb 2011
0.00 miles
4
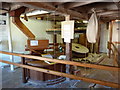
Otterton Mill
This is the western side of the mill with one set of clothed and working stones and one set that are unclothed. The crown wheel is visible and drives the sack hoist. The elephant tubing is to keep the stones dry.
Image: © Chris Allen
Taken: 12 Feb 2011
0.00 miles
5

Otterton Mill - runner stone
"This stone worked the first time tis true May 1st 1862." This is a runner stone and was underdrift. The square opening was for a patented balancing mechanism. The stones ran quite fast and needed to be balanced.
Image: © Chris Allen
Taken: 12 Feb 2011
0.00 miles
6

Otterton Mill - the stones
The two sets of stones in the western side of the mill. The sack is hanging on the chain of the sack hoist. The crown wheel drives the hoist.
Image: © Chris Allen
Taken: 12 Feb 2011
0.00 miles
7

Otterton Mill - gear teeth
This is a detail of the crown wheel. It is a cast iron wheel with wooden teeth. The woods favoured were apple or hornbeam. The teeth are inserted from above and secured by pins through their tails (visible below the wheel). The use of wooden teeth, often running against iron teeth, resulted in quiet running and allowed for a less catastrophic failure if something jammed. To even out wear it was common to run an odd number of teeth on one wheel against an even number on the other - the supernumerary being called the hunting tooth.
Image: © Chris Allen
Taken: 12 Feb 2011
0.00 miles
8

Otterton Mill - bin floor
Not a very good angle but the wooden roof construction is clear. This is not a public area and I held the camera up the stairs at arms length to get this shot without wandering past the no entry sign.
Image: © Chris Allen
Taken: 12 Feb 2011
0.00 miles
9
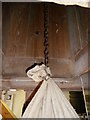
Otterton Mill - sack hoist
This shows quite clearly the way the chain of the sack hoist is looped around the neck of a traditional sack and grips it so tightly that it can be left dangling indefinitely. The sack is between the stone floor and the bin floor. The sacks always travel up through hinged trap-doors that bang closed when the sack has passed. In taking a sack to the bin floor, the miller will count the bangs and after the final one will take the pressure off the friction drive to the sack hoist, letting gravity run the sack back to sit neatly on the top set of trap-doors. Although the doors are strong, I would personally never walk across a set - don't invite trouble!
Image: © Chris Allen
Taken: 12 Feb 2011
0.00 miles
10
Otterton : Fore Street
Looking out of the village with Otterton Mill on the left.
Image: © Lewis Clarke
Taken: 28 Apr 2010
0.01 miles