IMAGES TAKEN NEAR TO
Forgue, HUNTLY, AB54 6BG
Introduction
This page details the photographs taken nearby to AB54 6BG by members of the Geograph project.
The Geograph project started in 2005 with the aim of publishing, organising and preserving representative images for every square kilometre of Great Britain, Ireland and the Isle of Man.

There are currently over 7.5m images from over14,400 individuals and you can help contribute to the project by visiting https://www.geograph.org.uk
Image Map
Images are licensed for reuse under creativecommons.org/licenses/by-sa/2.0
Notes
- Clicking on the map will re-center to the selected point.
- The higher the marker number, the further away the image location is from the centre of the postcode.
Image Listing (11 Images Found)
Images are licensed for reuse under creativecommons.org/licenses/by-sa/2.0
Image
Details
Distance
1
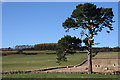
Lonesome Pine
This Scots Pine (Pinus sylvestris) is a bit lop-sided, having probably lost the branches on one side to north-easterly winter gales. The ground slopes up to a plantation on Fourman Hill.
Image: © Anne Burgess
Taken: 16 Nov 2015
0.13 miles
2
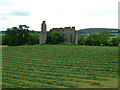
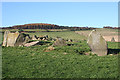
Yonder Bognie Recumbent Stone Circle (1)
Only nine of the stones here are thought to be parts of the original circle, the rest being boulders collected from the fields and dumped inside the circle. See https://canmore.org.uk/site/18335/yonder-bognie for more details. Image]
Image: © Anne Burgess
Taken: 16 Nov 2015
0.24 miles
3

Yonder Bognie Recumbent Stone Circle (2)
The recumbent and west flanker are still standing. The alignment of the recumbent is towards the Hill of Foudland in Image See https://canmore.org.uk/site/18335/yonder-bognie for more information. Image]
Image: © Anne Burgess
Taken: 16 Nov 2015
0.24 miles
4
Yonder Bognie Recumbent Stone Circle (3)
This shows the recumbent setting. The recumbent and west flanker (on the left) are still standing, but the east flanker has fallen. See https://canmore.org.uk/site/18335/yonder-bognie for more information. Image]
Image: © Anne Burgess
Taken: 16 Nov 2015
0.24 miles
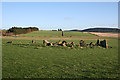
5
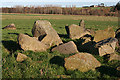
Yonder Bognie Recumbent Stone Circle (4)
Several of the stones still standing are visible in this view. At extreme left is the recumbent setting. Two of the orthostats are on the right, one close to the camera and one on the far side of the circle. The remaining stones are difficult to pick out among the dumped field boulders. Image]
Image: © Anne Burgess
Taken: 16 Nov 2015
0.24 miles
6
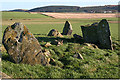
Yonder Bognie Recumbent Stone Circle (7)
I think the tallest stone in this collection is one of the four surviving orthostats, and the upright one in the background is another, but the rest are field boulders that have been dumped here. See https://canmore.org.uk/site/18335/yonder-bognie for more information. Image]
Image: © Anne Burgess
Taken: 16 Nov 2015
0.24 miles
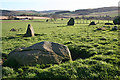
7
Yonder Bognie Recumbent Stone Circle (8)
Closest to the camera is one of the stones of the circumference, with the recumbent setting to the right and one of the other standing stones in the background. The rest of the stones are dumped field boulders. See https://canmore.org.uk/site/18335/yonder-bognie for more information. Image]
Image: © Anne Burgess
Taken: 16 Nov 2015
0.24 miles
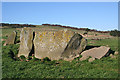
8
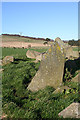
Yonder Bognie Recumbent Stone Circle (6)
This is one of the four remaining stones in the circumference of the circle, with an accumulation of field boulders around it. See https://canmore.org.uk/site/18335/yonder-bognie for more information. Image]
Image: © Anne Burgess
Taken: 16 Nov 2015
0.24 miles
9
Yonder Bognie Recumbent Stone Circle (9)
The closest stone is the most northerly of the circle, now fallen and moved out of position outside the circumference. Beyond it are the two remaining stones of the east arc, another, lower, stone which appears to be on the arc but is actually inside the circle, and the end of the recumbent. See https://canmore.org.uk/site/18335/yonder-bognie for more information. Image]
Image: © Anne Burgess
Taken: 16 Nov 2015
0.24 miles