IMAGES TAKEN NEAR TO
Keymer Court, BURGESS HILL, RH15 0AA
Introduction
This page details the photographs taken nearby to Keymer Court, RH15 0AA by members of the Geograph project.
The Geograph project started in 2005 with the aim of publishing, organising and preserving representative images for every square kilometre of Great Britain, Ireland and the Isle of Man.

There are currently over 7.5m images from over14,400 individuals and you can help contribute to the project by visiting https://www.geograph.org.uk
Image Map (Loading...)


Getting Data...Please wait
Leaflet Map data © OpenStreetMap
Images are licensed for reuse under creativecommons.org/licenses/by-sa/2.0
Notes
- Clicking on the map will re-center to the selected point.
- The higher the marker number, the further away the image location is from the centre of the postcode.
Image Listing (60 Images Found)
Images are licensed for reuse under creativecommons.org/licenses/by-sa/2.0
Image
Details
Distance
1
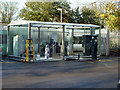
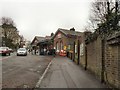
Installing ticket gates, Burgess Hill station
By the down platform, a new glass panelled shelter houses ticket gates and ticket machines. They are not yet in use, and the way to the platform is open on the right. A man is working on the wiring of the machine on the left, behind the step-ladder.
Image: © Robin Webster
Taken: 19 Nov 2010
0.03 miles
2
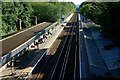
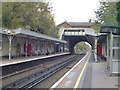
Burgess Hill Railway Station, Sussex
Looking from the footbridge above the railway lines. My train approaches; a late-running Bedford-bound service.
Image: © Peter Trimming
Taken: 8 Aug 2011
0.04 miles
3
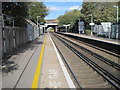
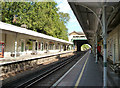
Burgess Hill railway station, West Sussex
Opened in late 1841 or early 1842 by the London & Brighton Railway, the original platforms were wooden, centred on the shed centre left, part of which is original and apparently contained all the original station facilities.
View north towards Wivelsfield and London. The station was extensively rebuilt a few metres further north in 1877.
Image: © Nigel Thompson
Taken: 18 Oct 2011
0.04 miles
4
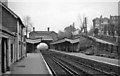
Burgess Hill Station
View northward, towards Haywards Heath, Redhill and London; ex-London, Brighton & South Coast, London - Brighton main line.
Image: © Ben Brooksbank
Taken: 12 Mar 1961
0.04 miles
5

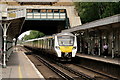
Burgess Hill Station
Looking north, with a Class 377 unit about to depart for London
Image: © Dr Neil Clifton
Taken: 18 Sep 2012
0.04 miles
7
Burgess Hill station
Looking north.
Image: © Dr Neil Clifton
Taken: 12 Nov 2015
0.04 miles
8
Burgess Hill Station
Looking north from the Down platform
Image: © Dr Neil Clifton
Taken: 18 Sep 2012
0.04 miles
9
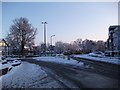
Hoadley's Corner
This roundabout is at Hoadley's Corner, a junction so named because of a department store that used to occupy the building to the left of this image. It is now more commonly known by locals as "the top of the town". Taken from Keymer Road (B2113) to Burgess Hill town centre. First exit is Junction Road, second exit to the immediate left of the mock tudor building is Silverdale Road, third exit is Keymer Road (B2113) towards Keymer.
Image: © Curtis Bateman
Taken: 7 Jan 2010
0.05 miles
10
Burgess Hill
Class 700 heading towards Brighton.
Image: © Peter Trimming
Taken: 17 Jul 2019
0.05 miles