IMAGES TAKEN NEAR TO
Hall Street, ALEXANDRIA, G83 9AL
Introduction
This page details the photographs taken nearby to Hall Street, G83 9AL by members of the Geograph project.
The Geograph project started in 2005 with the aim of publishing, organising and preserving representative images for every square kilometre of Great Britain, Ireland and the Isle of Man.

There are currently over 7.5m images from over14,400 individuals and you can help contribute to the project by visiting https://www.geograph.org.uk
Image Map
Images are licensed for reuse under creativecommons.org/licenses/by-sa/2.0
Notes
- Clicking on the map will re-center to the selected point.
- The higher the marker number, the further away the image location is from the centre of the postcode.
Image Listing (119 Images Found)
Images are licensed for reuse under creativecommons.org/licenses/by-sa/2.0
Image
Details
Distance
1
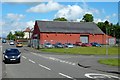
Leven Street Motors, Bonhill
This large building at the junction of Burn Street (shown on the left) and Hillbank Street is now used as a garage, but it served as a drill hall during the First World War: see https://canmore.org.uk/site/332989/bonhill-burn-street-drill-hall (at Canmore).
For a view from the front of the building, see Image For a slightly more distant view, with context, see Image
Another contributor's article provides a useful listing of sites that were used as drill halls during the First World War: http://www.geograph.org.uk/article/WW1-Great-War-Centenary---Drill-Halls
Burn Street is so called because a burn used to flow along it: Image
Image: © Lairich Rig
Taken: 21 May 2014
0.03 miles
2

Leven Street Motors, Bonhill
This garage is on Burn Street, opposite the junction with Hall Street. The building had been used as a drill hall during the First World War.
See Image for a view from another angle, and Image for one from further away.
Another contributor's article provides a useful listing of sites that were used as drill halls during the First World War: http://www.geograph.org.uk/article/WW1-Great-War-Centenary---Drill-Halls
Image: © Lairich Rig
Taken: 14 Feb 2016
0.03 miles
3

Junction of Burn Street and Hillbank Street
The area is called Bonhill. Burn Street is on the left; just beyond the nearest lamp post, Hillbank Street branches off from it. The large building near the centre of the picture is now a garage, but was used as a drill hall during the First World War: Image
Image: © Lairich Rig
Taken: 21 May 2014
0.04 miles
4
Hillbank Street, Bonhill, Alexandria
Hillbank Street from the Pappert Burn.
Image: © Raibeart MacAoidh
Taken: 21 Mar 2019
0.07 miles
5
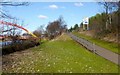
Path to Bonhill Bridge
This is the final section of the route (click on the end-note title for other pictures). The path on the right leads up to the main road, which it joins at the eastern end of Image
Image: © Lairich Rig
Taken: 25 Feb 2013
0.09 miles
6
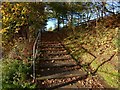
Steps leading to Stirling Road
Two lower flights of steps, one leading from Main Street, Bonhill, the other from the corner of George Street and Campbell Street, lead directly to the foot of the flight shown here.
Image: © Lairich Rig
Taken: 29 Oct 2017
0.09 miles
7
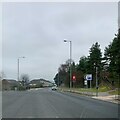
Traffic lights, Main Street, Bonhill
Traffic lights and main road towards Jamestown from Bonhill Bridge Area, on the right hand side is a red sandstone building which used to be the village school.
Image: © George Rankin
Taken: 1 Apr 2021
0.10 miles
8
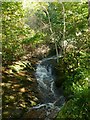
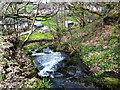
The Pappert Burn
This section of the burn flows past the northern side of Image The lower reaches of the burn (roughly, from here onwards) seem also to be referred to as the Bonhill Burn.
Image: © Lairich Rig
Taken: 5 Oct 2012
0.10 miles
9

Steps to Dalmonach Road
The path leads up from Main Road near the eastern end of the Image
Image: © Lairich Rig
Taken: 5 Apr 2019
0.10 miles
10
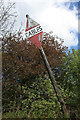
Cables!
Old warning sign for cables on the eastern bank of the River Leven at Bonhill.
Image: © Richard Sutcliffe
Taken: 11 May 2019
0.10 miles