IMAGES TAKEN NEAR TO
Roman Court, GLASGOW, G61 2HS
Introduction
This page details the photographs taken nearby to Roman Court, G61 2HS by members of the Geograph project.
The Geograph project started in 2005 with the aim of publishing, organising and preserving representative images for every square kilometre of Great Britain, Ireland and the Isle of Man.

There are currently over 7.5m images from over14,400 individuals and you can help contribute to the project by visiting https://www.geograph.org.uk
Image Map
Images are licensed for reuse under creativecommons.org/licenses/by-sa/2.0
Notes
- Clicking on the map will re-center to the selected point.
- The higher the marker number, the further away the image location is from the centre of the postcode.
Image Listing (338 Images Found)
Images are licensed for reuse under creativecommons.org/licenses/by-sa/2.0
Image
Details
Distance
1
Roman baths, Bearsden
Taken from the latrines' site, as befits this lowly Briton's status.
Image: © Peter Whatley
Taken: 16 Sep 2014
0.01 miles
2
Bearsden Roman Bath-house: the Hot Dry Room
After entering and passing through the changing room (Image), the bather entered the cold room (Image), which was the building's central hall. From there, the sudatorium ("the hot dry room") was on the left.
The present picture was taken from the cold room (part of which is in the foreground), and shows, just ahead, the hot dry room. Note the fragmentary arch at its far end; the arched opening there admitted hot air from the furnace.
[The Romans' own term for the room, sudatorium, denotes the "sweating-room" (from the Latin "sudor").]
Image: © Lairich Rig
Taken: 3 Jul 2015
0.01 miles
3
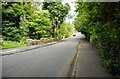
Grange Road, Bearsden
The bridge is crossing the Manse Burn.
Image: © Richard Sutcliffe
Taken: 29 Jul 2020
0.01 miles
4
Frigidarium, Bearsden Roman Baths
The frigidarium was the cold room of a Roman bath house.
Image: © Stephen Sweeney
Taken: 10 Jan 2010
0.01 miles
5
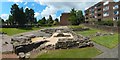
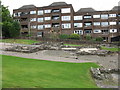
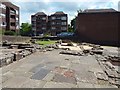
Remains of Roman bath-house at Bearsden
This is a wide-angle view from the eastern end of the site, from what would have been the eastern rampart of the annexe.
(The bath-house was in an eastern annexe of Bearsden fort; the annexe was not an extension of the fort, but was created when the original large enclosure of the fort was subdivided into a smaller fort enclosure and an annexe.)
Of the visible remains shown here, the nearest part, in the left foreground, was the furnace, providing underfloor heating for some of the rooms; a few of those rooms were additionally heated by means of wall cavities.
The view direction (looking west) for this photograph is the same as that of the Antonine Wall. The Wall itself was not far to the north (right), in the area occupied by the large building on the right.
Parallel to the Antonine Wall, and a little to the south of it, was the Military Way. The present-day main road, which is called Roman Road, appears to follow its course. The main road (Image / Image) is on the other side of the modern stone wall that can be seen, with trees beside it, on the left in this picture.
Bearsden Fort extended southwards from the Wall to the Military Way, and about as far again to the south (the Military Way therefore ran through the middle of the fort). The fort included the area occupied by the large building visible ahead, as well as the area facing it on the other side of the main road.
The fort's eastern annexe included the area shown here (with the bath-house), and, once again, the area facing it on the other side of the main road.
The other rooms of the bath-house are depicted in separate photographs, and need not be described here in detail. Click on the end-note title for other views.
For other contributors' earlier pictures of the bath-house, see Image / Image / Image / Image / Image
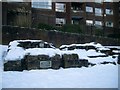
For the appearance of the site in winter, see Image / Image / Image / Image
Image: © Lairich Rig
Taken: 3 Jul 2015
0.02 miles
6
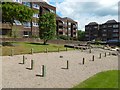
Bearsden Roman Bath-house: entrance
The area set off by wooden posts was the location of the entrance and of the changing room of the bath-house. The entrance was at the left.
[The Romans' term for the changing room of their bath-house, "apodyterium", is a straight borrowing of the Greek word for the same thing: ἀποδυτήριον – an "undressing room", from ἀποδύω, "to strip off, undress".]
Image: © Lairich Rig
Taken: 3 Jul 2015
0.02 miles
7
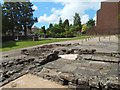
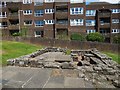
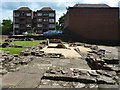
Remains of Roman bath-house at Bearsden
The small opening visible in the foreground is a duct for underfloor heating. The raised area behind it is the First Warm Room (Image).
The view is from the Second Warm Room; this would also have had a raised flagged floor, but, to show what lay beneath, the underlying pillars (to support the flagtones) have been exposed to view, and the intervening spaces filled with gravel.
The cold bath (Image) can also been seen from here.
In the background is a plinth with an information panel on it (Image), near the gate that is the entrance to the site.
Image: © Lairich Rig
Taken: 3 Jul 2015
0.02 miles
8
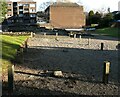
Bearsden Bath-house
Remains of the Roman bath-house, built in about 142AD. The posts show the original outline of the changing rooms. The fort was situated beside the Antonine Wall, the line of which is now covered by the flats behind.
The bath-house is a Scheduled Monument http://portal.historicenvironment.scot/designation/SM90334. The Antonine Wall was declared a World Heritage Site in 2008
Image: © Richard Sutcliffe
Taken: 21 Nov 2021
0.02 miles
9
Bearsden Roman Bath-house: the Cold Room
The area in the foreground was the frigidarium, the "cold room", the first room entered after leaving the changing room (for which, see Image).
Note the modern flagstone with a star-shaped hole. The cold room extended up to and a little beyond that star. The raised area just beyond the star is the far end of the cold room.
To the left of the cold room is the hot dry room.
Ahead are the rooms that collectively made up the "steam range" (Image); in order: the first warm room, the second warm room, the hot room, and (to the right of the hot room) the hot bath.
On the right is the last room to be visited, the cold bath (Image).
Image: © Lairich Rig
Taken: 3 Jul 2015
0.02 miles
10
Bearsden Roman Bath-house: the Steam Range
The title refers collectively to several rooms of the bath-house, which I show here as a group in order to illustrate their positions relative to one another.
The interpretation panel (Image) on the site explains the possible routes that would be taken through the bath-house. From the entrance and the changing room (Image), the bather would enter the Cold Room, which formed the building's central hall: Image
To its left was the Hot Dry Room (sudatorium, Image). However, the bather could choose to proceed, instead, directly to the Steam Range, comprising the following rooms: the First Warm Room, the Second Warm Room, the Hot Room, and (optionally) the Hot Bath, before visiting the Cold Bath (Image) and returning to the changing room.
The present picture was taken from the central hall, the Cold Room (frigidarium). Note, just ahead, a low section of wall with a gap on the left. This was the wall separating the Cold Room from the First Warm Room (tepidarium), and the gap shows the location of the doorway. As the picture shows, the First Warm room is presently paved with modern flagstones; it is also shown in Image
Beyond the First Warm Room are three rooms which are without flagstones, and which have a much lighter floor surface (there, gravel has been used to fill the spaces between pillars, which once supported a raised floor, for underfloor heating).
The nearest of those unflagged rooms, directly behind the First Warm Room, is the Second Warm Room (tepidarium); note the staggered arrangement of the doorways (the doorway leading to the Second Warm Room is on the right), whether for a measure of privacy or to reduce draughts, I do not know.
Directly behind the Second Warm Room (and so in front of the nearest car) is the Hot Room (caldarium). To its right (and in front of the blank near side of a large building) is a smaller room, which contained the Hot Bath.
The furnace was beside the Hot Bath, as is better seen in a view of the site from the other end.
In the left background of the present picture are some bits of wall from an earlier bath-house that had not yet been finished when the Romans' plans for this site changed; they then demolished that earlier incomplete bath-house to make way for the one whose remains are visible today.
Image: © Lairich Rig
Taken: 3 Jul 2015
0.02 miles