IMAGES TAKEN NEAR TO
Maud, PETERHEAD, AB42 5PJ
Introduction
This page details the photographs taken nearby to AB42 5PJ by members of the Geograph project.
The Geograph project started in 2005 with the aim of publishing, organising and preserving representative images for every square kilometre of Great Britain, Ireland and the Isle of Man.

There are currently over 7.5m images from over14,400 individuals and you can help contribute to the project by visiting https://www.geograph.org.uk
Image Map
Images are licensed for reuse under creativecommons.org/licenses/by-sa/2.0
Notes
- Clicking on the map will re-center to the selected point.
- The higher the marker number, the further away the image location is from the centre of the postcode.
Image Listing (9 Images Found)
Images are licensed for reuse under creativecommons.org/licenses/by-sa/2.0
Image
Details
Distance
1
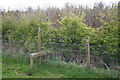
Access Denied?
Very kind of someone to provide this simple stile, but it has been rendered completely useless by the hawthorn hedge growing on the other side of it.
Image: © Anne Burgess
Taken: 7 May 2015
0.19 miles
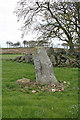
2

Auchmachar Recumbent Stone Circle (1)
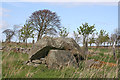
This circle is extremely disappointing. Only a single stone still stands, and though the recumbent and a flanker are still in position, they are all but buried by the boulders cleared from the field and piled up on top of them along the dyke under the tree. Saddest of all is that many of these stones have been piled there relatively recently, since 1968, when an Ordnance Survey surveyor visited and photographed the recumbent setting. See http://canmore.rcahms.gov.uk/en/site/20746/details/auchmachar/ for details of this circle. Image]
Image: © Anne Burgess
Taken: 7 May 2015
0.19 miles
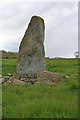
3
Auchmachar Recumbent Stone Circle (2)
This is the sole remaining stone of this circle. The recumbent and flankers are buried among the field boulders under the tree in the background. See http://canmore.rcahms.gov.uk/en/site/20746/details/auchmachar/ for details of this circle. Image]
Image: © Anne Burgess
Taken: 7 May 2015
0.20 miles
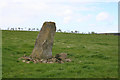
4
Auchmachar Recumbent Stone Circle (3)
The sole remaining stone of the circle, looking uphill towards Knapperty Hill. See http://canmore.rcahms.gov.uk/en/site/20746/details/auchmachar/ for details of this circle. Image]
Image: © Anne Burgess
Taken: 7 May 2015
0.20 miles
5
Auchmachar Recumbent Stone Circle (4)
The solitary remaining standing stone of the circle, on the slope of Knapperty Hill. See http://canmore.rcahms.gov.uk/en/site/20746/details/auchmachar/ for details of this circle. Image]
Image: © Anne Burgess
Taken: 7 May 2015
0.20 miles
6
Massive Boulders (1)
Although there are or were a long cairn, an ordinary cairn, and a recumbent stone circle in this vicinity, I don't think these are part of any of those. The circle is too far away for them to have been part of it, and they are much larger than the stones normally found in cairns. The ordinary cairn was quite close to here, but a Ordnance Survey surveyor found no trace of it in 1968, and you could hardly miss something this size.
Image: © Anne Burgess
Taken: 7 May 2015
0.20 miles
7
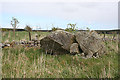
Massive Boulders (2)
Although there are or were a long cairn, an ordinary cairn, and a recumbent stone circle in this vicinity, I don't think these are part of any of those. The circle is too far away for them to have been part of it, and they are much larger than the stones normally found in cairns. The ordinary cairn was quite close to here, but a Ordnance Survey surveyor found no trace of it in 1968, and you could hardly miss something this size.
Image: © Anne Burgess
Taken: 7 May 2015
0.20 miles
8
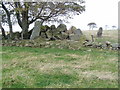
Remains Auchmachar Stone Circle
Only two standing stones remain of this stone circle with the rest being piled at field edge.
Image: © Ewen Rennie
Taken: 19 Oct 2005
0.20 miles
9
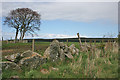
Boulder Dyke
I'm not sure how effective this dyke would be in containing livestock, so perhaps it's not surprising that it is supplemented by a fence.
Image: © Anne Burgess
Taken: 7 May 2015
0.22 miles