IMAGES TAKEN NEAR TO
Hextall Lane, STAFFORD, ST18 9GZ
Introduction
This page details the photographs taken nearby to Hextall Lane, ST18 9GZ by members of the Geograph project.
The Geograph project started in 2005 with the aim of publishing, organising and preserving representative images for every square kilometre of Great Britain, Ireland and the Isle of Man.

There are currently over 7.5m images from over14,400 individuals and you can help contribute to the project by visiting https://www.geograph.org.uk
Image Map (Loading...)


Getting Data...Please wait
Leaflet Map data © OpenStreetMap
Images are licensed for reuse under creativecommons.org/licenses/by-sa/2.0
Notes
- Clicking on the map will re-center to the selected point.
- The higher the marker number, the further away the image location is from the centre of the postcode.
Image Listing (12 Images Found)
Images are licensed for reuse under creativecommons.org/licenses/by-sa/2.0
Image
Details
Distance
1
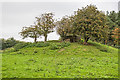
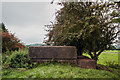
WWII Staffordshire: RAF Seighford - Battle HQ (8)
-
Airfield Battle HQ: EDoB ID: S0013658/e01172
My first attempt to access this remote site saw me defeated on the first occasion by an aggressive ram, and on the second by a herd of cattle who insisted on investigating me without social distancing, and who remained completely unfazed by my frantic arm waving. Fortunately it was a case of third time lucky.
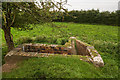
Seighford's Battle HQ overlooks the former airfield as intended, and is a conventional type with a single observation cupola. For those who don't know, most WWII airfields had these underground bunkers that were equipped with a telephone exchange, Defence Officer's post, messengers, etc., and were intended as a refuge of last resort in the event the airfield had been overrun by the enemy. It was from here that the airfield defences would then be coordinated and controlled by the Defence Officer.
Image
Image: © Mike Searle
Taken: 16 Sep 2020
0.17 miles
2

WWII Staffordshire: RAF Seighford - Battle HQ (9)
-
Airfield Battle HQ: EDoB ID: S0013658/e01172
The observation cupola that gave a 360 degree view via the narrow viewing slit. Immediately in front is the emergency exit, currently sealed with a heavy iron plate.
Image
Image: © Mike Searle
Taken: 16 Sep 2020
0.17 miles
3
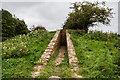
WWII Staffordshire: RAF Seighford - Battle HQ (10)
-
Airfield Battle HQ: EDoB ID: S0013658/e01172
The entrance passage is formed by blast walls on both sides, and describes two right-angled turns (right and then left) at the end to gain access.
Image
Image: © Mike Searle
Taken: 16 Sep 2020
0.17 miles
4
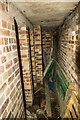
WWII Staffordshire: RAF Seighford - Battle HQ (11)
-
Airfield Battle HQ: EDoB ID: S0013658/e01172
A left turn from the end of the entrance passage leads inside the bunker to a passage that leads off to various rooms within. The narrow space at the far end would have been for a chemical toilet (Elsan).
Image
Image: © Mike Searle
Taken: 16 Sep 2020
0.17 miles
5
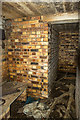
WWII Staffordshire: RAF Seighford - Battle HQ (12)
-
Airfield Battle HQ: EDoB ID: S0013658/e01172
A small concrete and brick shelf can be seen in the former messengers and runners room. Beyond is the passage to the PBX (telephone exchange).
Image
Image: © Mike Searle
Taken: 16 Sep 2020
0.17 miles
6
WWII Staffordshire: RAF Seighford - Battle HQ (13)
-
Airfield Battle HQ: EDoB ID: S0013658/e01172
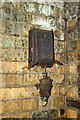
Electricity main isolator switch in the Messengers and Runners room.
Image
Image: © Mike Searle
Taken: 16 Sep 2020
0.17 miles
7
WWII Staffordshire: RAF Seighford - Battle HQ (14)
-
Airfield Battle HQ: EDoB ID: S0013658/e01172
The Defence Officer's Room with its hatch openings to the Messengers and Runners room on the left, and to the PBX (telephone exchange) at the end. The issue hatches still have their original wooden frames (and are of a non standard size). A diagram of the room layout of a typical BHQ can be seen here:
http://www.pillbox-study-group.org.uk/other-wwii-defensive-structures/battle-headquarters/bhqdiagram/
Image
Image: © Mike Searle
Taken: 16 Sep 2020
0.17 miles
8
WWII Staffordshire: RAF Seighford - Battle HQ (15)
-
Airfield Battle HQ: EDoB ID: S0013658/e01172
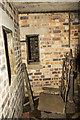
Steps lead up to the ladder to the escape hatch emergency exit.
Image
Image: © Mike Searle
Taken: 16 Sep 2020
0.17 miles
9
WWII Staffordshire: RAF Seighford - Battle HQ (16)
-
Airfield Battle HQ: EDoB ID: S0013658/e01172
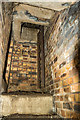
The entrance passage requires two right-angled turns (one right, one left) before the bunker is accessed.
Image
Image: © Mike Searle
Taken: 16 Sep 2020
0.17 miles
10
WWII Staffordshire: RAF Seighford - Battle HQ (17)
-
Airfield Battle HQ: EDoB ID: S0013658/e01172
A contextual side view of the observation cupola.
START: Image
Image: © Mike Searle
Taken: 16 Sep 2020
0.17 miles