IMAGES TAKEN NEAR TO
Taptonville Crescent, SHEFFIELD, S10 5BP
Introduction
This page details the photographs taken nearby to Taptonville Crescent, S10 5BP by members of the Geograph project.
The Geograph project started in 2005 with the aim of publishing, organising and preserving representative images for every square kilometre of Great Britain, Ireland and the Isle of Man.

There are currently over 7.5m images from over14,400 individuals and you can help contribute to the project by visiting https://www.geograph.org.uk
Image Map
Images are licensed for reuse under creativecommons.org/licenses/by-sa/2.0
Notes
- Clicking on the map will re-center to the selected point.
- The higher the marker number, the further away the image location is from the centre of the postcode.
Image Listing (187 Images Found)
Images are licensed for reuse under creativecommons.org/licenses/by-sa/2.0
Image
Details
Distance
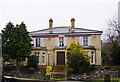
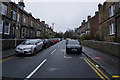
1
Spooner Road, Broomhill
Branches off Crookes Road close to the centre of Broomhill. Mainly houses, but has a builder's yard half way up.
Taken from near the South Sea public house http://www.geograph.org.uk/photo/1006967
Image: © Dave Hitchborne
Taken: 6 Aug 2008
0.04 miles
2
Former Cottage Industry, Broomhill, Sheffield
Just here, at the bottom left of Spooner Road, there once stood a thriving Cottage Industry. It was a small industry that hand-made sports equipment. The main items were Cricket bats and Hockey sticks. A Jim Wade and Ronald Ellis ran the business in the two-storey building, which survived the gales in Sheffield, with very little damage, but the upper floor had to be replaced after a fire. Six or seven people including Wade & Ellis and me worked at any one time in conditions which would not be allowed these days. Wood dust and wood shavings were everywhere. At the age of 15, I started working there on Saturday mornings. When I left school I started full–time and served my apprenticeship from 1957-1963.
The building stood to the north end of a court yard. Attached to it was a long row of wooden buildings that were probably stables when first built. An archway led to some steps that dropped down to an alleyway. The alleyway ran between a row of shops, and through to Fulwood Road. Adjacent to the alleyway was a Baker's shop that sold yummy cream buns, egg custards and apple charlottes. Across the road a Butcher's shop sold hot pork sandwiches, in a bread bun, with loads of crispy crackling. The Baker's shop went when the others in that row were demolished. The factory was razed to the ground as was a pub called the South Sea Hotel. The pub has been replaced, as have the shops, which now have a roof-top car park. Because the courtyard space was available for building on, it meant the shops could be set further back from Fulwood Road. They now also have shop-front parking spaces and a separate adjoining drive-through parallel to Fulwood Road.
Making the Hockey Sticks
The Handle – The handles of the hockey stick were made of Manila cane, which arrived in its rough state, bent, and about 3m long. The canes were sawn on an unguarded circular saw to almost the correct length, which then had to be straightened by brute force. Each length was held in a Coopers vice and a steel tube about 60cm long with an inside diameter of about 60mm was placed over the end to bend the cane to shape. Occasionally it would snap in two and send you flying backwards.
Sometimes the cane was too thin and so two lengths had to be hand–planed on one side and then glued together and tied with hemp. After the glue had set, short lengths of cane were hand–planed to later be glued to the handle end of the longer canes, to thicken it for the grip. Before that could take place the ends of the cane had to be tapered to accept the short pieces. The short pieces sometimes broke away during turning on the lathe even though they were formed first with a Cooper’s knife to alleviate this.
Turning in the lathe was hazardous for all sorts of reasons. Complete lack of dust extraction and no protection for the eyes. The chuck wasn’t ‘live’ and so over tightening between the centres could cause the ends to smoke from burning and almost catch fire. You had to breathe this in as well. The ‘ends’ mentioned earlier, occasionally flew off and struck you a sharp blow and some times the cane would split apart at the join and fly off the lathe at great speed – it was quite dangerous work. I’ve seen pieces hit the wall beyond the lathe, run up it and then along the ceiling and drop behind me. After turning, the cane was also sanded in the lathe – more dust. The end to be glued to the head was then cut to a V–shape.
The Head – The heads were either Mulberry or Ash, which had been bent into shape after being ‘steamed’. The Ash heads arrived pre–shaped, but roughly formed and without the V–cut to insert the handle. The Mulberry heads were almost fully formed, but also without the V–cut. NOTE – The Mulberry heads did not have the hook shape of today’s heads. The cut–out was marked on the head and the shape was cut out on a band saw. Once the handles had been V–cut, an animal glue was applied and the two ends hammered together and then bound with hemp and tied. Once tied, wedges were driven between string and handle (the inserts cut out of the head, became wedges) and hammered home. This tightened the grip of the head to the handle. The glued components were then left for a day to dry. Later removal of the string cause cuts to the hand. The squeezed out glue adhered to the string and became like shards of glass. The string was used over and over again, until it was unworkable.
The Hockey Stick – The head and handle were shaped together using a Cooper’s knife, a rasp and a smoothing plane, a spoke shave and a scraper. The ash heads had to have the ends rounded with a rasp and then tapered and then spoke–shaved to shape. The rasped end of the head was smoothed on a large sanding disc, which was attached to the same shaft as the unguarded circular saw.
Three cuts were sawn into the handle ends for the ‘springing’. The cuts were 50–60mm long and strips of rubber were glued and inserted into the cuts, supposedly take the shock out of the handle from contact with the head and puck. Next day, the rubber inserts were trimmed back to the handle and then further sanding was done on a belt sander. The dust from the machine was extreme to say the least. A hood attached to a dust extractor inadequately coped at one end of the rollers. The final sanding by hand using glass paper was done in a Cooper’s vice, but only after a cabinet scraper was used to remove the deep lines caused by the belt sander. Hand–sanding the Hockey sticks with glass paper made your hands bleed. It was very painful in wintertime.
After sanding was completed, a binding of tape was applied from just above the splice at head and handle, to the very end of the handle. The tape was hand–painted with a white cellulose paint to just below where the grip would later be applied. In a small spray booth, which was ventilated only by a small extractor fan, a spraying of clear cellulose was applied to the whole head and the previously part. Once dried, transfers were added and thin strips of coloured tape for decoration. Then more coats of clear cellulose applied. When the paint had dried a length of rubber tubing was rolled onto the handle as a grip. Once positioned, the rubber grip was rolled back, a thin coating of animal glue was painted onto the tape, and then the grip was rolled back again to cover the handle.
I don’t remember how many handles I could turn on the lathe a day, but I could and did shape 48 Hockey sticks.
The Cricket Bat - http://www.geograph.org.uk/photo/983944
Image: © Dave Hitchborne
Taken: 6 Aug 2008
0.06 miles
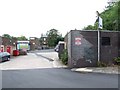
3
Former Cottage Industry, Broomhill, Sheffield
Just here, at the bottom left of Spooner Road, there once stood a thriving Cottage Industry. It was a small industry that hand-made sports equipment. The main items were Cricket bats and Hockey sticks. A Jim Wade and Ronald Ellis ran the business in the two-storey building, which survived the gales in Sheffield, with very little damage, but the upper floor had to be replaced after a fire. Six or seven people including Wade & Ellis and me worked at any one time in conditions which would not be allowed these days. Wood dust and wood shavings were everywhere. At the age of 15, I started working there on Saturday mornings. When I left school I started full–time and served my apprenticeship from 1957-1963.
The building stood to the north end of a court yard. Attached to it was a long row of wooden buildings that were probably stables when first built. Just here, where the blue–brick building stands, was a garage space for a car, where indeed one stood for years. To the rear was an off–shot and to the left the main building.
Main Building – Ground Floor
The rectangular two–storey brick building was normally approached from the sloping courtyard and the doorway in the south wall was reached by climbing two concrete steps. Inside and almost immediately to the left, was a flight of wooden steps. Beneath the steps, was a built–in wooden rack holding many hockey sticks heads. Beyond the steps and rack was a doorway down to the turning and sanding room. Then you reached the west wall, which had a floor to ceiling rack full of hockey stick heads and such.
To the right of the outer door was a box–shaped wood burning stove sunk in a pit in the thick concrete floor. All the wood shavings and saw dust were burnt in this stove, much to the annoyance of a nearby elderly resident. In times of heavy usage this stove turned cherry red with the heat. A stovepipe chimney protruded from the back into the room, rather than the wall and I got very burned when tripping over some wood on the floor and grabbing the chimney for support.
Beyond the stove was a window and then a long workbench on the inner east wall, to the right of which stood a double gas ring for the glue pots. The gas rings once set fire to some discarded wood shavings and then set the place alight. To the left of the bench was a doorway into the finishing room and then the north wall.
To the right of the north wall was the press (see below). It was positioned next to the finishing room doorway and when using it, it meant stopping for people coming through, which was very irritating.
To the left of the press was a long workbench, a cupboard, with first aid kit and sandpaper inside and wireless on top and further along, another workbench, where I worked. In this far corner, there were no windows or dust extraction at my bench at all. At first, there was no heating save which reached from the stove, but eventually after two or three years overhead infra–red heaters were installed. These were absolutely useless, in as much they burned your scalp, but didn’t warm the rest of you.
Circular Saw and Disc Sanding Room
Further along and at the end of my bench, was a flight of concrete steps up into an off–shot building where all the cane and willow was stored. In the centre was a large circular saw bench and sanding disc. The saw had a riving knife, but the guard was fixed so far above the blade as to render it useless. Thick dust and cobwebs coated the walls, which were brushed down about every six months, if that. All the ‘old’ cane was so covered in dust as to be unrecognisable as cane. This room had no heating at all and no residual heat ever reached it, as the door was always kept closed because of noise from the saw. Double garage doors in the east wall of the off–shot were where the ‘goods’ came in.
Main Building – Ground Floor
Back in the main building. Down the centre of the building were two long workbenches, which ran from the west wall to the east wall, but stopping short at the east to allow access around the end. There was a break, almost in the middle of the benches, for the large bandsaw. The saw was positioned next to a pillar, which supported the middle of the upper–floor. These benches had four work stations in total and the other three had one each. Under each bench was stored more hockey stick heads, and handles and stuff that never saw the light of day.
Main Building – Upper Floor
On the upper floor were more benches, but the room was just a waste of space with bits and pieces littering the place and it was rarely used, but for access to the office above the finishing room. Mostly, there was just stacks of brown paper scattered about. At the west end of the south wall was access to space above the turning and sanding room. It just contained junk.
Turning and Sanding Room
This room was part of a row of what I think were stables and it butted up to the main building. There was a purpose built lathe and belt sander and sink with Ascot boiler and a stove. The lathe was very long and could have been used to turn a substantial piece of timber. It was let down by the fact that it didn’t have a live centre and so burned the wood at the turning end and forever needed tightening up. All the adjustable bits had a coarse thread and so adjustment was very crude and tough to use. This machine had no dust extraction whatsoever. Whatever you turned, you got covered in, as did the floor, and bench. There was a platform to stand on, which had been constructed to allow dust to fall through, but before the end of a session on the lathe, this had filled over and above the platform.
The belt sander had two very heavy rollers, which over–ran for ages when the machine was switched off or when the belt broke. There were no means of braking this. A dust extractor, in the shape of a bin, collected dust from a hood at the driven roller end. A huge amount of dust came off the cricket bats and the extractor was unable to cope and so you and everything else in the room quickly got covered in it. At times, it was necessary to go out of the room when you couldn’t see anymore, for the dust. It makes me cough now, just thinking about it.
Cups of tea were made in this room. Laughable isn’t it.
Finishing Room
This room, in the east end of the building, was the place where transfers, and coloured tape were applied to the hockey stick heads and hand and spray painting was done. A lady worked in here, shut off from the noise and dust, but subjected to breathing in cellulose paint and thinners. The only means of extraction from the spray paint and fumes was via a small extractor fan to the outside. Because it smelled of pear drops, it was deemed to be OK and “Smells nice”, was the message I got.
The Office
Upstairs was the smoke filled office, where much deliberation seemed to be done. Sometimes, the Bosses spent a great deal of time up there and this inevitably led to ‘larking about’ or ‘idling’ downstairs. Nothing serious, but it relieved the boredom of looking at four walls all day.
The place has long gone, but the memories of my first job remain. My weekly wage was £1/2s/6d for Mon–Fri and Saturday morning, at the start, for a 47½ hr week, and all the dust you could breathe in.
The Cricket Bat
The Handle
The handles were constructed of between one, or up to four pieces of Manila cane or sixteen pieces of Sarawak cane. For a description of the Manila cane handle, see http://www.geograph.org.uk/photo/934074 The Sarawak cane was about 20mm in thickness and about 3m long when delivered and the sixteen-piece handle was made up as follows. The cane was sawn to, just over the correct length, and then easily straightened in a Cooper’s vice. Four lengths were planed – two on one side and two on both sides. Obviously it would be impossible to clamp the cane in a vice to plane it, so an old wooden type spokeshave blade was hammered into the bench, blade facing the operator and the cane was tapped into the blade to hold it steady for planing. It didn’t split the cane as a thin piece of wood, beneath bench and blade, prevented this. The canes were then glued together. Hemp was bound around the canes and then they were left overnight to dry.
This action was repeated four times for one handle, forty times for ten, and so on. Next day, the hemp was removed and four of these pieces were planed two on one side and two on both sides. When the pieces were ready, three strips of rubber, about 25cm long were glued in between to act as the ‘springing’ and wedges were hammered between hemp and cane to clamp them together, making up 16 pieces. This didn’t always result in a firm bond, as sometimes a touch of the chisel during turning on the lathe resulted in the handle flying to pieces. You were lucky to get away with a hard lashing across the knuckles.
The Blade
The Cricket Bat Willow blades arrived roughly cut and oversize in thickness. I can best describe the end shape as being an oblong with an inverted triangle attached. The blade was parallel in shape in its length, most all of the cutting and shaping done after pressing. Willow is very soft in its natural state and cannot withstand the blow of a cricket ball. A serious dent would result and so it was necessary to compress the surface and harden it. You might say, “Why not use a harder wood?” Well the weight of it would make it too heavy to handle.
To begin with, just the top was shaped and it was planed to the shape of the roller on the press. The press consisted of two very rigid parallel lengths of steel trackwork bolted to a bench. The ‘bed’ on which the blade lay, was very heavily made. The long steel oblong ‘bed’ supported the blade for its length. It was ‘V’ notched to match the base of the blade and it ran on rollers. A toothed wheel mounted on a winding handle, drove a toothed rack, which was attached beneath the ’bed’. Turn the handle clockwise and the ‘bed’ moved from left to right, anti–clockwise and it returned from right to left. The handle was attached mid–way along the length of the trackwork, beneath the ‘bed’ and between two upright girders. A roller, mounted in the girders above the ‘bed’, was positioned in a casing, which slid up and down in the girders, but was controlled downwards and upwards with a thick screwed rod and handle.
The shaped blade was laid in the track and the roller was lowered with the handle to meet it. A few passes were made by winding the ‘bed’ back and forth, but with very little pressure applied. Too much pressure all at once resulted in wrinkled cracking at the blades edges. Gradually, pressure was increased until it got very hard to turn the winding handle. The blade was subject to a few blows with a Croquet ball mallet and inspected for dents. If the blade didn’t survive the blows it was given a few more ‘runs’ on the ‘bed’. At times, sheer bodyweight was required to rotate the winding handle and a bit of a shove against the nearest wall. It was strenuous work and quickly resulted in calluses to the hand and a six–pack.
The blade then had the ‘V’ shaped cut to accept the handle, which was done on a large bandsaw. The handle was ‘V’ shaped cut to splice into the blade and then glued and hammered in.
The Bat
Once the glue had dried, which was usually about 24hrs, the bat was cut and planed into shape with a Cooper’s knife, spokeshave and block plane and then sanded on a belt sander. Laborious sanding was then done by hand to remove the rough sanding of the belt sander. All that was necessary then was to brand the name of the manufacturer on the blade with a hot iron, attach cloth tape to the handle, followed by the rubber grip and give it a few coats of linseed oil. A hard shine could be given, by rubbing the blade with a piece of Manila cane oiled with a light coat of linseed oil. Occasionally, cloth tape was bound, in a broad patch, around the ‘sweet spot’ of the blade, for added protection. A light coating of watered down animal glue was applied to secure it.
I can’t remember how many bats I shaped a day, nor how many cricket bat handles I turned on the lathe, but when a piecework rate was worked out for planing the Sarawak cane I managed to earn almost three times my weekly wage, one week. It had taken my bosses a whole day to work the rate out and it was quickly announced that they must have got the piecework rate all wrong. It was obvious to me that I was, by far, the better grafter or they were lousy at maths.
The Hockey Stick - http://www.geograph.org.uk/photo/934074
Image: © Dave Hitchborne
Taken: 6 Aug 2008
0.06 miles
5
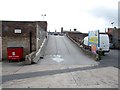
Rooftop Car Park, Broomhill
The ramp leads to a rooftop car park above a row of shops, on Fulwood Road. The car park is the subject of much controversy.
I was unaware of the controversy about the rooftop car park and glad now that I didn’t take my car up there to take the photographs.
http://www.sheffieldtelegraph.co.uk/letters/Beverley-Warne--on-the.3853303.jp
http://www.sheffieldtelegraph.co.uk/news/Pressure-on-parking-firm-over.3932764.jp
http://sheffieldlibdems.org.uk/news/000199/local_councillor_stands_up_to_car_park_bullies.html
http://www.thestar.co.uk/action/No-mercy-from-car-park.3758094.jp
http://www.thestar.co.uk/action/All39s-fine-after-rogue-ticket.4276938.jp
http://www.consumeractiongroup.co.uk/forum/parking-traffic-offences/130083-excel-parking.html
Image: © Dave Hitchborne
Taken: 6 Aug 2008
0.06 miles
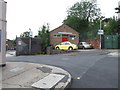
7
South Sea, Spooner Road, Broomhill
Viewed from where a small manufactures once stood. http://www.geograph.org.uk/photo/934074 http://www.geograph.org.uk/photo/983944 The former factory made sports equipment. The pub itself stands where terraced houses used to be and bears no resemblance to its predecessor, which was pulled down years ago. A part of the site where I'm standing, namely the car park, is the subject of much controversy. I'm just glad I didn't park there, even for a minute.
Image: © Dave Hitchborne
Taken: 6 Aug 2008
0.07 miles
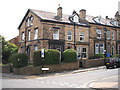
9

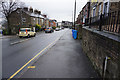
Crookes Road, Broomhill
This road is a former tram route to Crookes, but since the night of 8th October 1960, buses have taken over. There never was a tram or bus stop here though. Nor would there have been room to construct a lay-by as properties were not set back from the road, as they are now. The building at the junction of Spooner Road was a Grocers and Off Licence, back in the 50s and 60s.
Image: © Dave Hitchborne
Taken: 6 Aug 2008
0.07 miles