IMAGES TAKEN NEAR TO
Giggleswick, SETTLE, BD24 0DJ
Introduction
This page details the photographs taken nearby to BD24 0DJ by members of the Geograph project.
The Geograph project started in 2005 with the aim of publishing, organising and preserving representative images for every square kilometre of Great Britain, Ireland and the Isle of Man.

There are currently over 7.5m images from over14,400 individuals and you can help contribute to the project by visiting https://www.geograph.org.uk
Image Map (Loading...)


Getting Data...Please wait
Leaflet Map data © OpenStreetMap
Images are licensed for reuse under creativecommons.org/licenses/by-sa/2.0
Notes
- Clicking on the map will re-center to the selected point.
- The higher the marker number, the further away the image location is from the centre of the postcode.
Image Listing (34 Images Found)
Images are licensed for reuse under creativecommons.org/licenses/by-sa/2.0
Image
Details
Distance
1
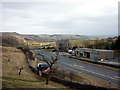
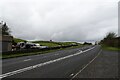
The scene at Buck Haw Brow
The layby is used by walkers and climbers (heading to Giggleswick Scar). The old Scar Top Garage (on the right) no longer operates. Down in the valley sun shines on the Giggleswick golf course.
Image: © Karl and Ali
Taken: 21 Mar 2010
0.00 miles
2
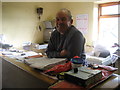
Scar Top Garage, Giggleswick
The proprietor Raymond before the garage finally closed in approx 2008.
Image: © Lynda Thorowgood
Taken: Unknown
0.01 miles
3
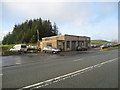
Scar Top Garage, Giggleswick
Scar Top Garage located at the very top of Buck Haw Brow Hill on the B6480. It sadly finally closed in approx 2008.
Image: © Lynda Thorowgood
Taken: Unknown
0.01 miles
4
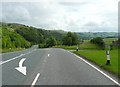
Buck Haw Brow, Settle
Looking down towards Settle, the old A65 was widened to provide a crawler lane, only to be superseded by the Settle bypass. This road was constructed as a turnpike road before 1775 (the date of Jefferys's map of Yorkshire). The older route was via Craven Bank Lane out of Giggleswick and through Lawkland village.
Image: © Humphrey Bolton
Taken: 2 Aug 2010
0.02 miles
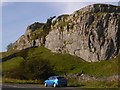
5
Scar Top Garage
Looking towards the garage from the layby on Buck Haw Brow.
Image: © DS Pugh
Taken: 2 Apr 2024
0.03 miles
7

Scar Top
Looking along Buck Haw Brow towards Settle.
Image: © DS Pugh
Taken: 2 Apr 2024
0.04 miles
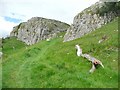
8
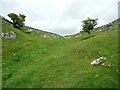
Bridleway to Feizor
After passing between two limestone crags the grassy track climbs up a dry valley.
Image: © Humphrey Bolton
Taken: 2 Aug 2010
0.04 miles
9
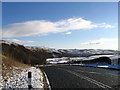
Buckhaw Brow
Looking down the B6480 that follows the side of Giggleswick Scar towards Settle.
Image: © Chris Eccleston
Taken: 26 Dec 2004
0.04 miles
10
Bridleway to Feizor
This takes advantage of a gap in the limestone crags.
Image: © Humphrey Bolton
Taken: 2 Aug 2010
0.04 miles