Terracotta production sequence ? 1
Introduction
The photograph on this page of Terracotta production sequence ? 1 by Alan Murray-Rust as part of the Geograph project.
The Geograph project started in 2005 with the aim of publishing, organising and preserving representative images for every square kilometre of Great Britain, Ireland and the Isle of Man.

There are currently over 7.5m images from over 14,400 individuals and you can help contribute to the project by visiting https://www.geograph.org.uk
Terracotta production sequence ? 1
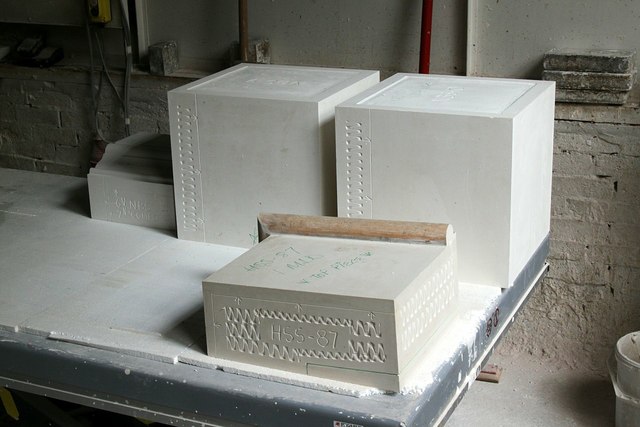
Image: © Alan Murray-Rust Taken: 24 Jul 2018
Plaster patterns. The lettering refers to the building for which the block is being prepared. The production process starts with the creation of a plaster pattern of the piece to be created (this view) . The pattern is approximately 6% larger than the finished piece to allow for natural clay shrinkage in both the drying and firing phases. The forming of the pattern may include profiling with a template http://www.geograph.org.uk/photo/5862636 and the addition of decorative elements moulded in clay. The pattern is coated in shellac http://www.geograph.org.uk/photo/5862637 http://www.geograph.org.uk/photo/5862638 and is then used to create negative moulds in which the terracotta pieces will be formed. Multiple moulds can be made from one pattern where large numbers of identical pieces are required http://www.geograph.org.uk/photo/5862639 , and the shellac ensures that mould and pattern can be separated without damage to delicate detail. For complex pieces the mould will be made up of several elements http://www.geograph.org.uk/photo/5862641 to enable easy separation from the piece. The final piece is formed by building up clay inside the mould manually http://www.geograph.org.uk/photo/5862642 to form a skin about two inches (5cm) thick, creating a large hollow block. The piece is allowed time to partially dry, shrinking slightly with the water removal, with the result that the mould can be easily removed and reused. The item can if required be finally hand finished at this stage http://www.geograph.org.uk/photo/5862644 http://www.geograph.org.uk/photo/5862647 http://www.geograph.org.uk/photo/5862648 . This may also include adding a colour glaze http://www.geograph.org.uk/photo/5862650 . Colour-glazed terracotta is normally referred to as faience, but there is no essential difference. The piece is then fired at high temperature http://www.geograph.org.uk/photo/5862652 and is now ready for installation http://www.geograph.org.uk/photo/5862655 . Use this link https://www.geograph.org.uk/search.php?i=85940965 to see the sequence as a slideshow. I am grateful to the management at Hathern Terra Cotta for facilitating my visit, allowing photos to be published and checking text details for accuracy.
Images are licensed for reuse under creativecommons.org/licenses/by-sa/2.0
Image Location
Latitude
52.761546
Longitude
-1.292944